The Gusset
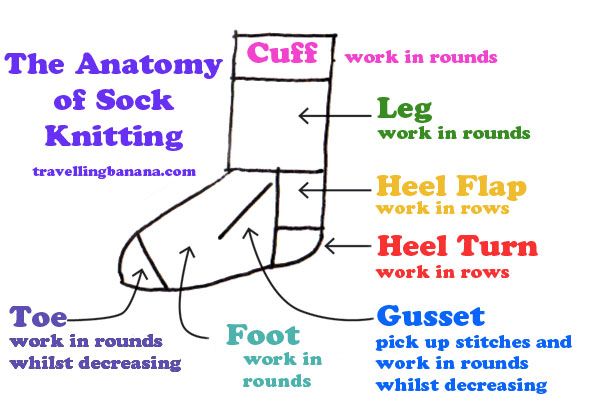
The gusset consists of two parts: picking up stitches to connect the heel flap with the rest of the sock and working decreases to shape the sides of the foot. There’s an extremely helpful video tutorial on how to do the sock gusset, magic loop style by the Knit Purl Hunter here.
You’re heading for the home straight there’s just the main foot and the toe left to do and you will have made your very first sock.
Another great feature of using the magic loop method is that you can try your sock on as you go. After you have completed the gusset you can slip the sock on whilst it is still attached to the circular needles. Just pull the two needles to the right of your work so that the ends of the stitches are not too close to fall off, then just pop your foot into your sock and check for size.
the Foot

Once the gusset decreases are complete it’s time to knit the body of the foot. For a plain stockinette stitch sock, simply knit every stitch of every round until the foot length measures 2 inches less than the desired total length. This usually means that you can stop knitting the foot section when the length reaches around the base of the big toe for adult size socks. This section is a nice breather from the concentration you’ve had to put in with the other sections up to now. Unless you are knitting a complicated pattern design for your sock, this section will knit up fast just like the leg section, but do keep an eye on the length in case you overshoot the mark.
The beauty of using the magic loop method is you only have to knit every round. Classic stockinette stitch normally involves knitting one row and purling the next to get the classic v shape stitch on the front of your work and the wavy looking stitch on the back.
The exception to this rule is when you are working back and forth on one needle making the heel flap as described above.
the Toe

You’re nearly done and you’re sock is really beginning to look like a real sock shape – can you believe it? All that you need to do now is continue knitting in the round and decrease as per the instructions on your pattern. It may look something like this:-
Rnd 1: K1, ssk, k to last 3 sts on back needle, k2tog, k1. Repeat on back of foot.
Rnd 2: Knit around.
Repeat rows 1 and 2 for about 16 rows (test on foot)
When 1⁄2 inch to go, work only decrease rows for 3 or four rows.
Once at the end you need to graft the front and back of the toe section together with the kitchener stitch. You can find a useful video on how to do this stitch here and is the best stitch to finish your sock for a nice neat edge.
You now have one sock made and are wearing it proudly…now you just need to grab those circular needles and make a matching one.
Mini History of the Sock
I guess we take the humble sock for granted. It’s one of the most durable items of clothing that we wear but have you ever thought about how socks came to be and who was the genius that worked out such an elaborate construction?


3 thoughts on “The Anatomy of Sock Knitting”