
Before delving into the step-by-step guide on setting up a Niagara Emitter system and creating a quick template to enhance your workflow, let’s briefly overview key terms and their respective functionalities.
Niagara is Unreal Engine’s next-generation powerful VFX system, which replaced Cascade.
Core Niagara Systems comprises of the following components:
Systems
Niagara systems are like containers for creating visual effects, such as a fireworks display. In the Niagara System Editor, you can manage and modify multiple emitters (like bursts in fireworks) grouped under one system, such as “Firework.” The Timeline panel helps organize and adjust these emitters. The Emitter Editor and System Editor share similarities.
Emitters
Niagara Emitters are containers that hold modules. They are single-purpose and reusable.
Modules
Modules in Niagara are the foundational components for creating visual effects. With modules, you can build functions, incorporate inputs, and write values or parameter maps to customize your visual effects.
You can learn more by visiting the Unreal Engine Official Documentation –
How to create your first Niagara Emitter and save it as a template
I’m going to assume that you know the basics of creating a new Level and setting up folders to keep your work organized.
This article will cover:
- How to set up a Niagara VFX template.
At the time of writing, I am using Unreal Engine version 5.3.2
How to set up a Niagara VFX template
- Open your project or create a new one
- Create a new folder to contain all the VFX that you will use in your project
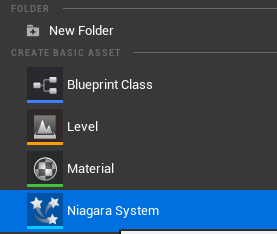
- In the VFX folder – open it and right-click in a blank space
- From the Create Basic Asset list – select Niagara System
- Pick the starting point for your system – select Create an empty system

- Give your new Niagara a name – as we are creating a blank template, call it NS_Blank
Note: If you want to create a Niagara system that requires different settings, please name it something like NS_smoke or NS_groundfog, etc. Later, you can always use these systems as your starting point when making smoke, fog, and other systems. - Double-click to open it up in the System container
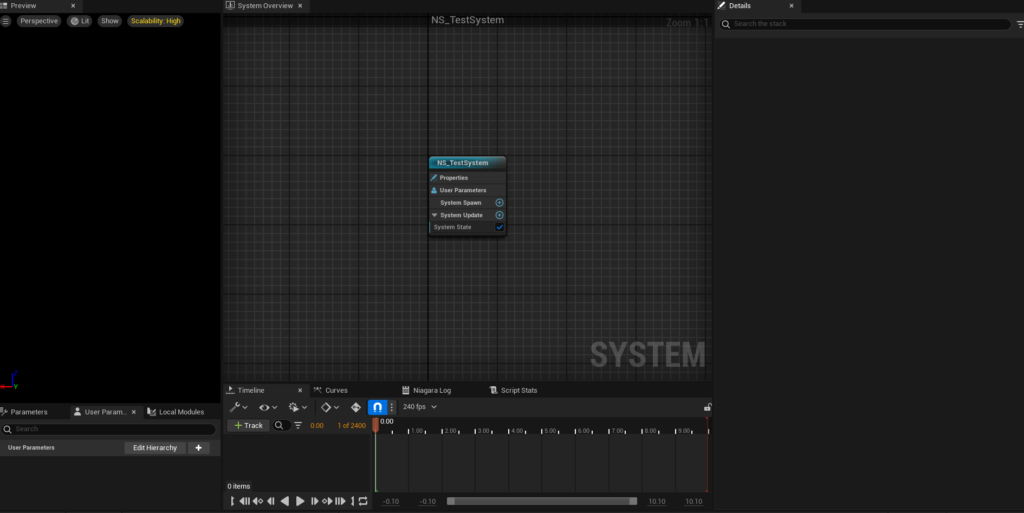
You should now be seeing something similar to the above screenshot.
I’ve called mine NS_TestSystem for the purpose of this article
Feel free to move this module around to give you space to work
- Right-click in an empty space in the system container
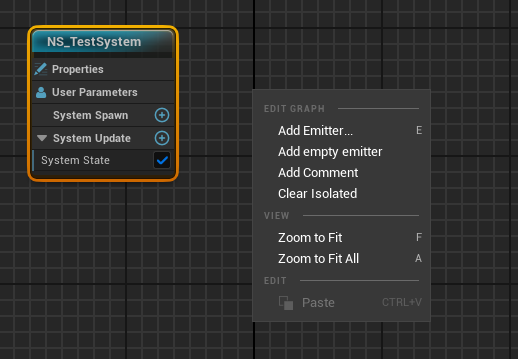
- Click on Add Emitter
- Select Empty from the Asset Type Templates list (don’t select add Empty emitter from the above list as it gives you slightly different parameters and works slightly differently)
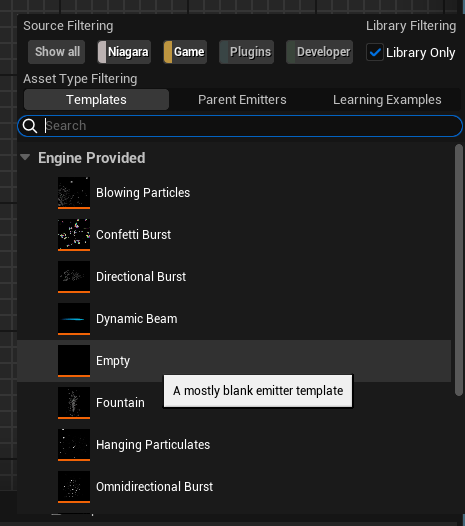
- Click on the Empty Emitter system so it becomes active, and press F2 – rename it emitter_particles. Click away or press return
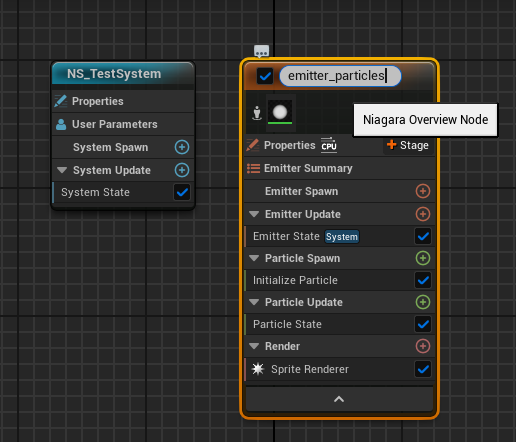
- The emitter works by following each section of the system in order. So it will start at the Emitter Spawn and work through all the levels, ending at the Sprite Renderer or the last entry in the system.
- By default, the timeline track will automatically play. This is useful to preview how the emitter is working. You can always press pause should you experience any performance issues, particularly when you have added the VFX to your main scene and are running simultaneously.
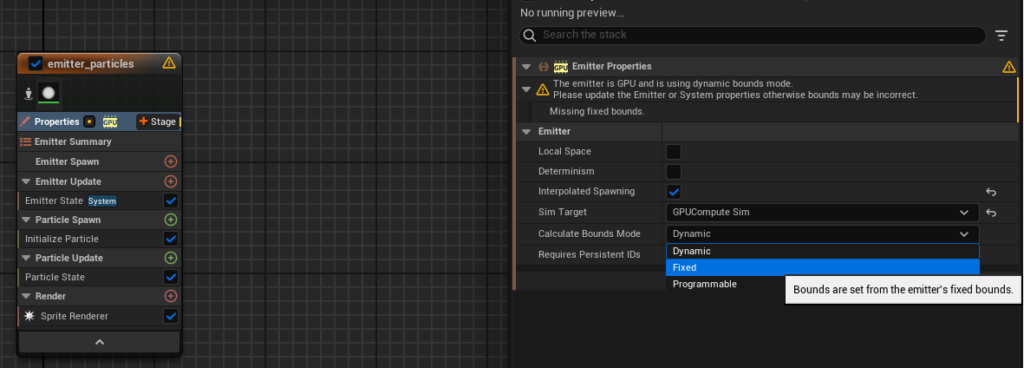
- Click Properties and change the Sim Target from CPUSim to GPUCompute Sim from dropdown
- You will get an error. To fix it, go to Calculate Bounds Mode, and from the drop-down, select Fixed
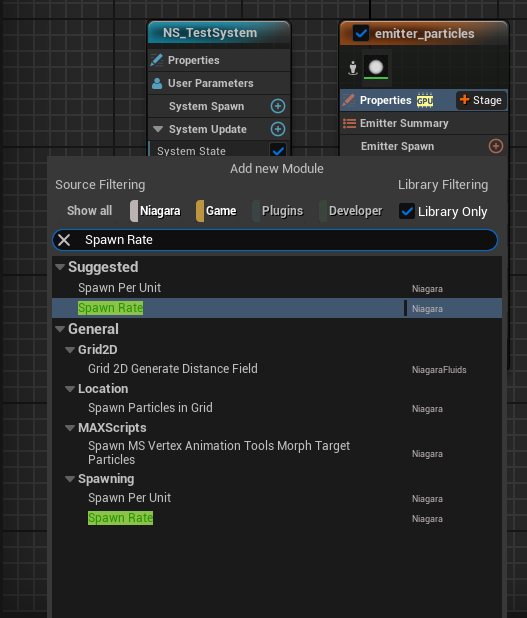
- In the emitter_particles system, click the plus sign next to Emitter Spawn and search for Spawn Rate. This will be the amount of particles that will initially be spawned. Set the SpawnRate to 500. If you see an error message – click Fix Issue.
The preview will show you what the emitter will look like. It’s not going to be spectacular at this point.
In the emitter_particles system, click the plus sign next to Emitter Spawn and search for Spawn Rate. This will be the amount of particles that will initially be spawned. Set the SpawnRate to 500. If you see an error message – click Fix Issue.
The preview will show you what the emitter will look like. It’s not going to be spectacular at this point.
- Under Particle Update, click the plus sign and search for Set Fluid Source Attributes. This will communicate with a new Emitter that we will add to the system in the next step.
- This module controls Density (smoke), Temperature (fire), Velocity Scale (how strong the emitter will be), and Radius (how small or large the emitter will be)
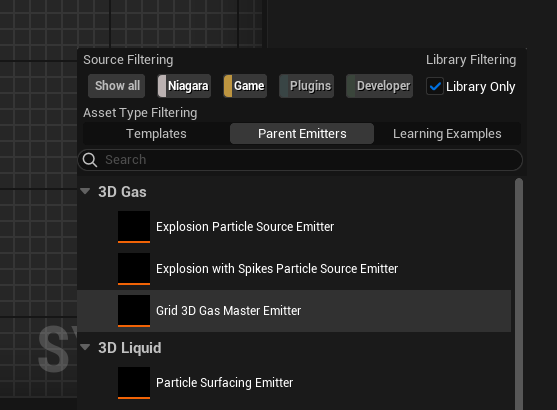
- Next, right-click on an empty space in the system and Add Emitter.
- This time, select Parent Emitters
- Select Grid 3D Gas Master Emitter
- This will load an extensive emitter summary showing many options. Most of these will not be used for the purposes of this template, so click on the small upward-facing arrow at the bottom of the list to minimize the options in view.
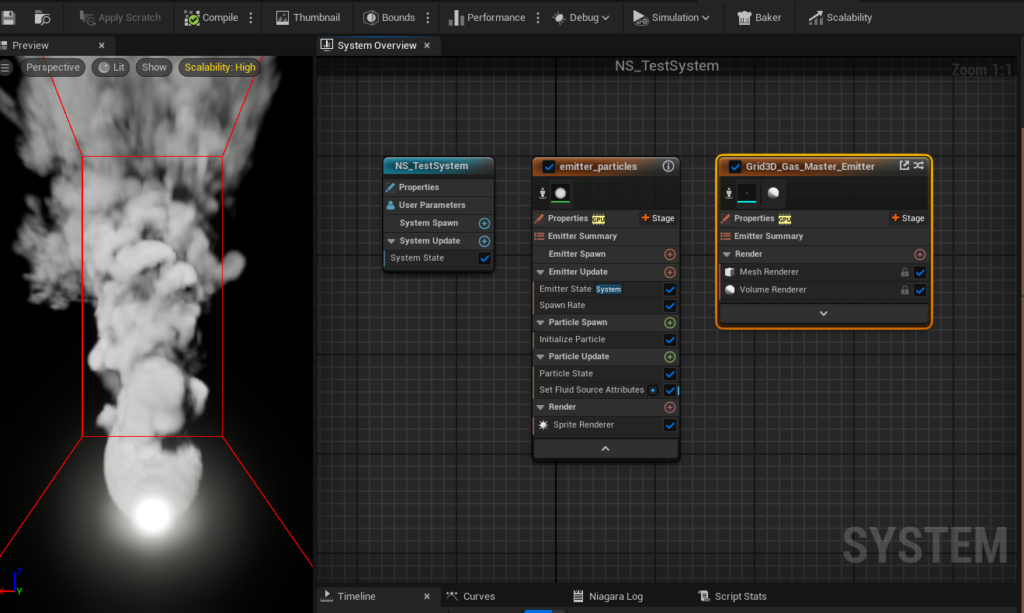
- The above image should be what you are seeing after minimizing the Grid3D_Gas_Master_Emitter
- The Preview area shows the emitter at the bottom and a sphere throwing out plumes of smoke. (if you paused your Timeline, press play to view a preview of your newly created Emitter in action)
- In the Grid3D_Gas_Master_Emitter module, click on Emitter Summary
- Click on the Source tab
- Under the Sphere Source section – uncheck Enable – this will remove the sphere and compile.
- It’s a good idea to Save All at this point and often as you add options. Either File, Save All, or Ctrl Shift S (Cmd if you are using a Mac)
- Staying in the Emitter Summary section
- Under Particle Source
- Select Emitter from dropdown
- Under Particle Reader – Emitter Name
- Highlight the name Grid3D_Gas_Master_Emitter and type emitter.
- This will give you the option to select our new emitter_particles module.
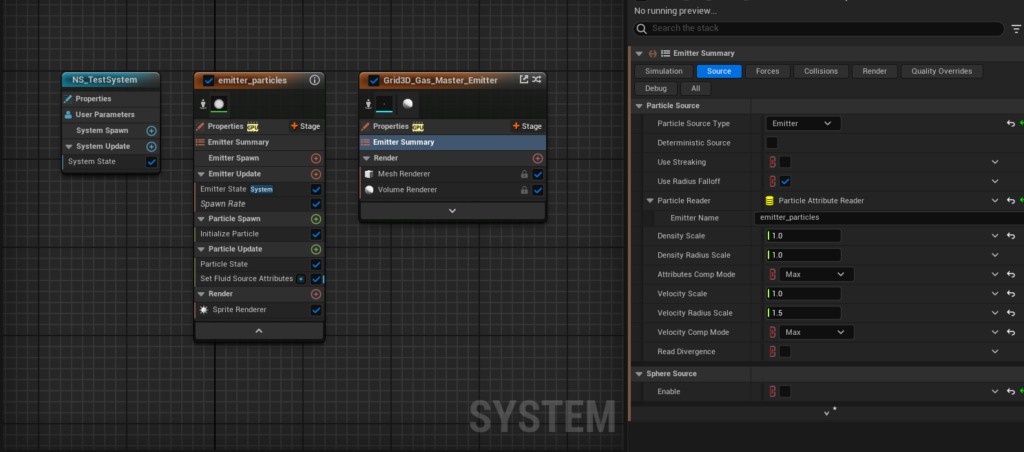
- Go back to emitter_particles
- Under Particle Spawn
- Click the plus sign and search for Add Velocity
- There will be an error saying the module has unmet dependencies.
- Click Fix Issue against Add new dependency module SolveForcesAndVelocity
- The error message will no longer be showing
- Under Particle Spawn
- Click on Initialize Particle
- Click on the Sprite tab
- Under Sprite Attributes – Sprite Size Mode – select Uniform from the dropdown list
- Click and drag Set Fluid Source Attributes and move to the bottom of the list (below Solve Forces and Velocity) for easy access.
- For now, leave the Sprite Renderer checkbox ticked.
The above instructions will be the blank setup that can be saved, renamed, and reused to speed up your workflow when setting up a new VFX in a project. If you are new to the system, it is a good idea to go through this process several times to learn the steps so you know where to make adjustments.
- Now, all you need to do is Save All and drag your new starter VFX into your scene to see what it looks like.
- Use this template as a starting base to adjust and amend the settings for your next blockbuster scene.
Next up: How to set up a Ground Fog VFX system
==============================================================
With Thanks to RedefineFX for his tutorials. You can discover more here

