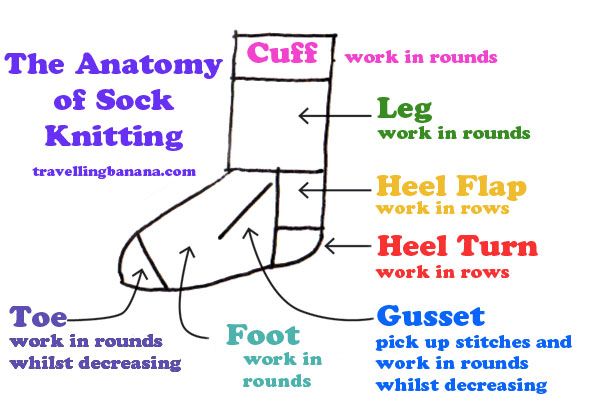
The Cuff
This part of the sock is usually stretchy and clings onto your leg to stop it falling down. You want to pick a stitch that will be stretchy but it will also have to be knit quite loose. The cuff also needs to be able to fit over the toes, the widest part of your foot and go over the heel but still sit well on your leg and not slide down all the time.
The number of stitches you cast on will also be determined somewhat by the ribbing you want to do for the cuff area. K1, P1 rib requires an even number of stitches. K2, P2 rib requires that the number of stitches be divisible by 4. If not, the ribs won’t match up at the beginning of the round.
The Leg
This is the easy part. The leg of the sock is the long tubular section that extends down from the cuff. You can knit this as long or as short as you like. Long up to your knee or short so it barely reaches your ankle. Just follow the pattern and required number of rounds until the leg section reaches your desired length.
I found knitting the cuff and the leg extremely easy, but when it came time to make the heel flap, turn the heel and then the gusset before finally venturing down the foot to make the final part of the sock, the toe, well I was just stuck at the heel flap area and would give up. I just didn’t understand the instructions. I then stumbled across a wonderful lady called the Knit Purl Hunter and after watching her videos and following her really easy video tutorial, everything made sense and fell into place. There’s a handy link to each video below so you can follow through as you reach each stage.
The Heel Flap
The heel flap is worked back and forth along one needle which will result in making one side of the knitting longer than the other side. The heel flap, as the name suggests, forms the back of the sock which goes down the back of your heel. Follow this video to understand how to do the Heel Flap then come back and find out what happens next. You will notice that you are only using one needle so when you turn your work you will need to alternate rows of knit and purl stitch which is normally not necessary when knitting magic loop style.
The Heel Turn
Once you have finished the heel flap you need to make the “cup” that your heel sits in and this is also worked in rows. This part of the sock can be worked in plain knit but you may come across a stitch for the heel called ‘The Eye of the Partridge’. I’ll describe how to do this stitch later but check out this great video tutorial on how to turn the heel here.

3 thoughts on “The Anatomy of Sock Knitting”